
Once your planning, soil test, structural design, and building approval are complete (covered in Plan Construction After Buying a Plot in Chennai), the next phase begins: Actual Construction.
Many first-time home builders in Chennai feel overwhelmed by the process. This blog explains the entire house construction journey step-by-step so you know exactly what happens on-site, why each stage matters, how long it takes, and how to track the work professionally.
Here is the breakdown of the construction process.
1. Pre-Construction Setup (Site Readiness)
Before the first brick is laid, the site must be prepared to support the workforce and machinery.
Do I Need a Borewell Before Starting Construction?
YES. Your site needs a continuous water supply. You cannot rely on water tankers for the entire project. Water is essential for:
-
Curing (crucial for strength)
-
Concrete mixing
-
Brick/block work
-
Plumbing testing
-
General cleaning
Borewell Cost in Chennai (2025 Estimates): For 150 ft depth + 1 HP submersible motor + plumbing setup: ₹90,000 – ₹1,00,000
Ready to start building? Get your free site & cost guidance today.
How Do I Get a Temporary EB Connection?
A temporary Electricity Board (EB) line is the second backbone of your project. It is required to:
-
Run heavy machinery (cutting & drilling machines)
-
Operate the borewell motor
-
Light the site for security
-
Estimated Cost: ~₹15,000
-
Time to Process: Approx. 1 week
2. Stage 1 — Site Marking & Excavation
Once the site is equipped with water and power, construction technically begins.
What Is Site Marking?
Site marking converts your paper drawings into physical lines on the ground. Engineers use rope, lime powder, and measurement tape to mark:
-
Footing and Column positions
-
Sump and Septic tank areas
-
Staircase block outlines
How Deep Should Excavation Be?
In Chennai, excavation depth depends heavily on the Soil Test Result and Safe Bearing Capacity (SBC). While typical depths range from 3 ft to 6 ft, the structural engineer will decide the precise depth based on the building load and number of floors.
3. Stage 2 — Foundation Work (The Strength of Your Home)
The foundation transfers the entire load of the house to the ground. Skipping quality here puts the whole building at risk.
Steps Involved in Foundation Construction:
-
PCC (Plain Cement Concrete): A flat base for the footing.
-
Footing Reinforcement: Steel rods tied as per design.
-
Footing Concrete: Pouring the concrete base.
-
Column Stubs: The starting point of your pillars.
-
Backfilling: Refilling earth around the foundation.
Which Foundation Type Is Best in Chennai?
-
Isolated Footing: Common for standard villas.
-
Combined Footing: Used when columns are closely spaced.
-
Raft Foundation: Recommended for weak or soft soil areas.
4. Stage 3 — Plinth Level & Basement Formation
This stage protects your home from rainwater flooding, dampness, and soil moisture rising from the ground.
Work involved at the Plinth Level:
-
Casting the Plinth Beam (ties all columns together).
-
Building the basement wall.
-
Soil filling inside the basement.
-
Compaction and leveling.
-
Final PCC layer.
Result: A strong, leveled base floor ready for the superstructure.
Ready to start building? Get your free site & cost guidance today.
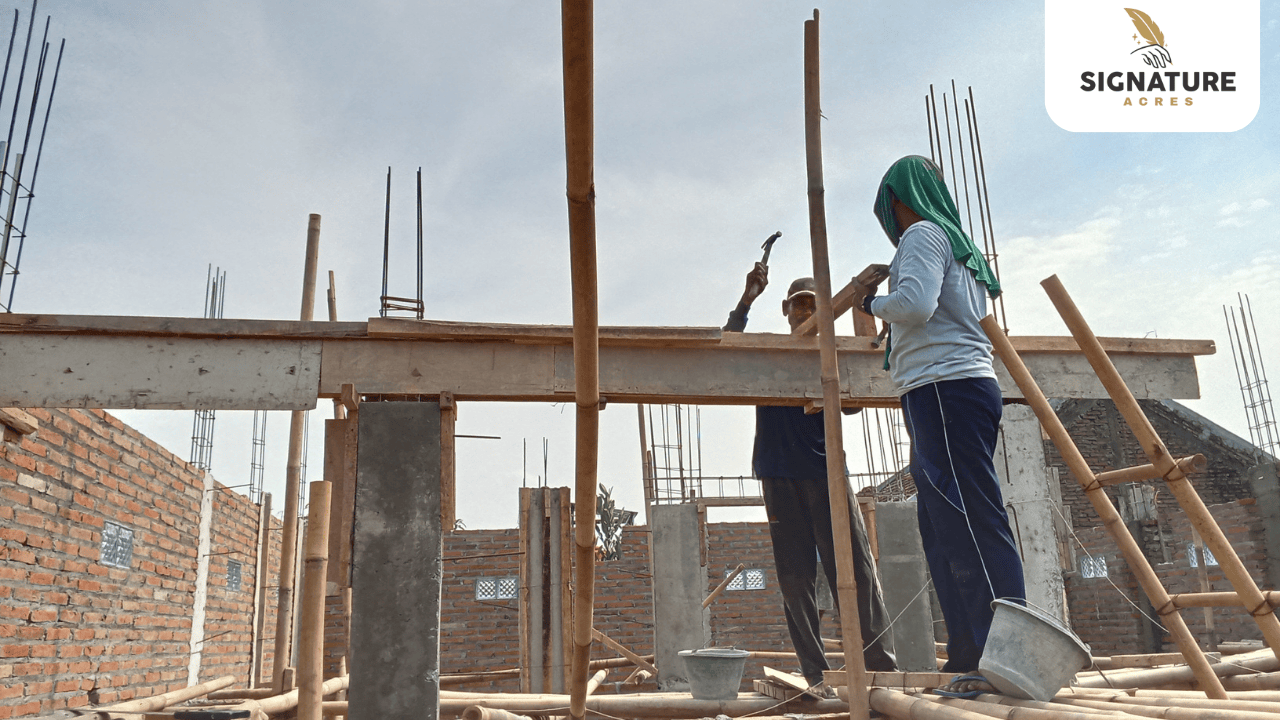
5. Stage 4 — RCC Superstructure (Columns, Beams & Roof)
This is when your building starts to rise and take shape visually.
What Is the RCC Superstructure?
RCC (Reinforced Cement Concrete) framing provides structural stability and earthquake resistance. It involves:
-
Column shuttering and concreting.
-
Beam and slab reinforcement (steel binding).
-
Roof slab casting.
Important Timelines:
-
How long to cure the roof? Minimum 14 days of water curing (ponding) is non-negotiable for strength.
-
How long does each floor take?
-
RCC work: 20–25 days
-
Curing: 14 days
-
Total per floor: 30–40 days
-
6. Stage 5 — Block Work (Walls & Partitions)
Once the concrete frame is cured, masonry work begins to define rooms, door openings, and window placements.
Which Block Is Better for House Construction?
Most builders in Chennai currently use one of the following:
-
AAC Blocks (Lightweight, heat resistant)
-
Red Clay Bricks (Traditional, strong)
-
Fly Ash Bricks (Cost-effective)
-
Porotherm Hollow Clay Blocks (Excellent thermal insulation)
7. Stage 6 — Electrical & Plumbing Rough-In
Note: This must be done before plastering to avoid damaging walls later.
Electrical Rough-In:
Conduits (pipes) are cut into the walls to create routes for wiring, switch boxes, AC points, TV/Wi-Fi points, and fan locations.
Plumbing Rough-In:
Installation of water lines, drainage pipes, hot/cold mixers, and bathroom points. A leak test is mandatory at this stage to prevent future seepage.
8. Stage 7 — Internal & External Plastering
Plastering protects the structure and provides a smooth finish.
-
Internal Plastering: Ensures smooth walls and a proper base for putty.
-
External Plastering: Acts as the first line of defense against rainfall and dampness.
9. Stage 8 — Putty, Tiles & Flooring Work
Now your home starts looking beautiful.
Sequence of work:
-
Wall Tiles: Kitchen dado and bathroom walls.
-
Flooring: Living room, bedrooms, and balcony tiles.
-
Staircase: Granite or tile fixing.
-
Skirting: Protects the bottom of the walls.
Ready to start building? Get your free site & cost guidance today.
10. Stage 9 — Finishing Works (The Final 30–45 Days)
This is the detailing phase where the structure transforms into a livable home.
Checklist for Finishing Works:
-
Electrical: Fitting switches, sockets, lights, and fans.
-
Plumbing: Installing faucets, showers, and sanitary ware (commodes/basins).
-
Carpentry: Hanging doors, window shutters, and kitchen lofts.
-
Painting: Final coats for interior and exterior.
-
Waterproofing: Terrace and bathroom final checks.
-
Final Cleaning: Removal of debris and dust.
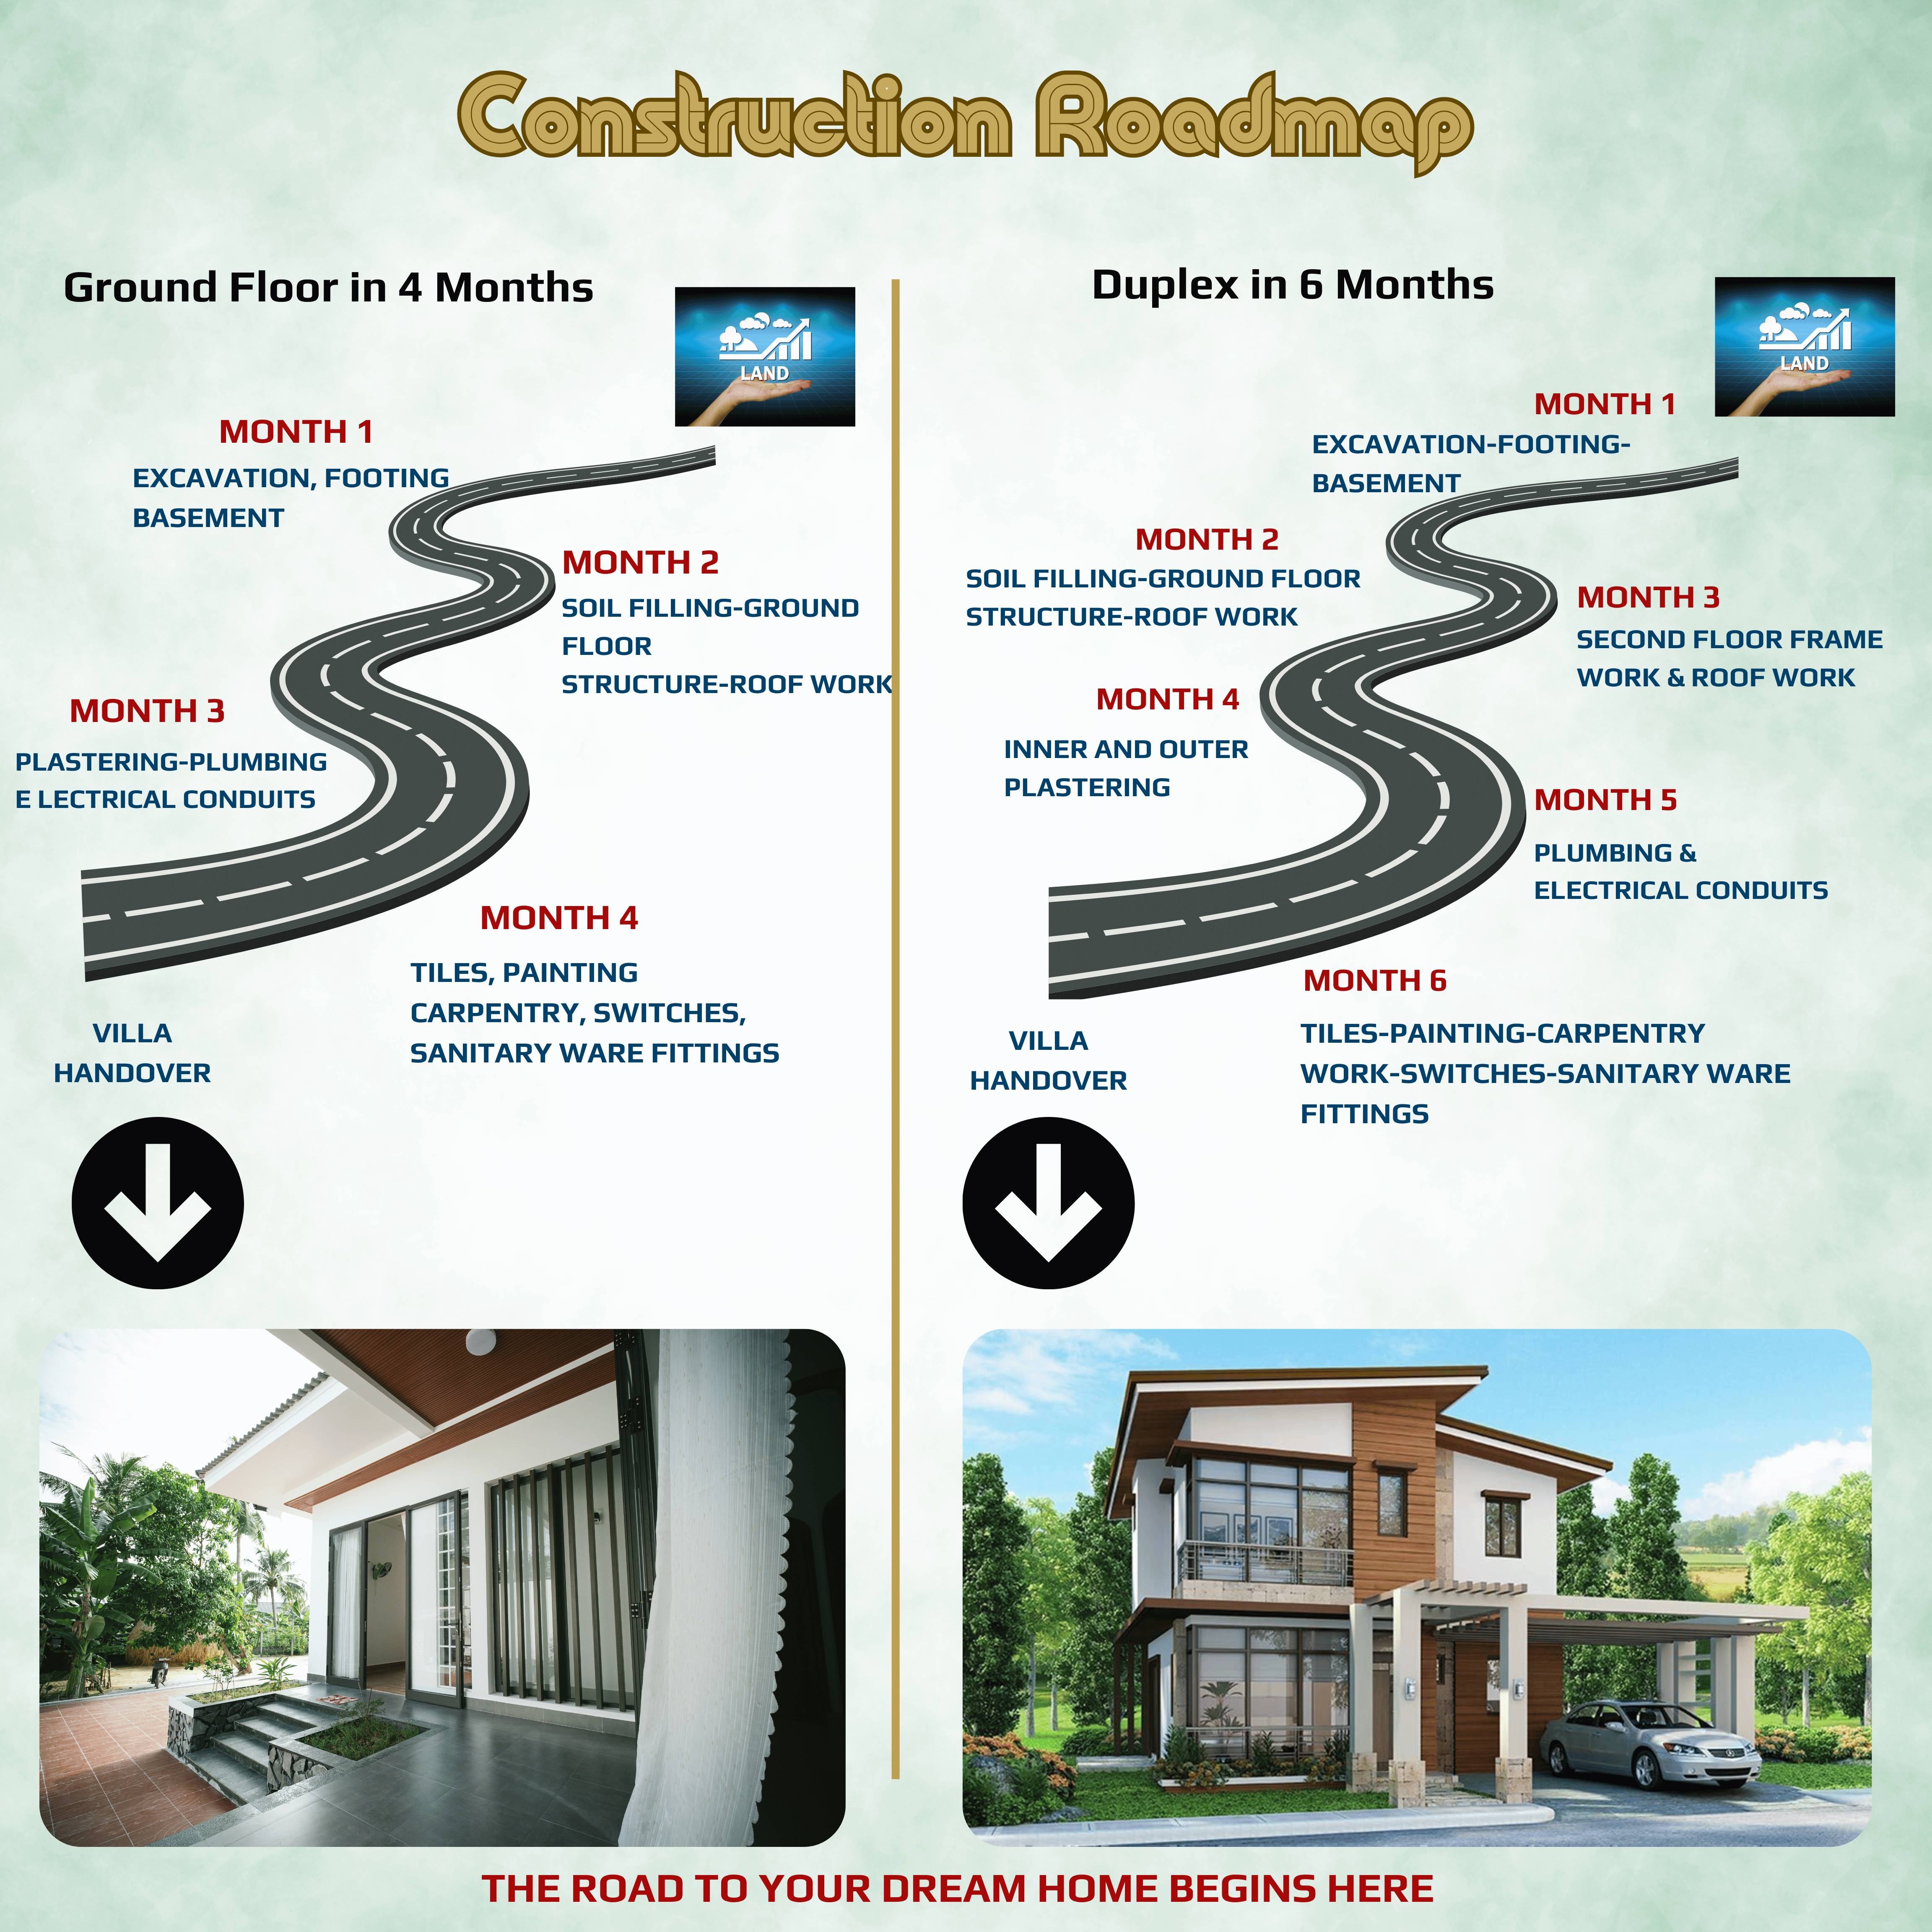
Summary: House Construction Timeline in Chennai
| House Type | Approx. Total Duration |
|---|---|
| Ground Floor Only (G) | 4–5 Months |
| G + 1 (Duplex) | 6–7 Months |
| G + 2 Floors | 7.5–9 Months |
Note: Timelines may vary based on weather (monsoons), material availability, labor strength, and design changes.

Ready to Start Building? Get a Free Construction Consultation Today.
Get expert guidance on planning, budgeting, approvals, and construction — all customized for your plot in Chennai. Quick, simple, and absolutely free.
📞 Book Free Consultation Or book a site visit — our team will guide you through every step.
With over a decade of experience crafting everything from elegant villas to durable multi-storey structures across Chennai, John Fedrick brings hands-on construction expertise to every project. His in-depth knowledge of materials, structure, and design empowers clients to make informed decisions that stand the test of time.